Community Planning: Methods
Local design statement
- description
- more detail
Local design statements are a way for local people to provide guidelines for new development in their area. They can be incorporated in local planning policy and provide a valuable way for local people to make a positive input into the planning process at an early stage. They are particularly useful in areas where local character is threatened by insensitive development.
A local design statement is drawn up by a specially formed team of local volunteers, preferably supported by local planners and national agencies.
The team secures the views of as many people as possible through publicity, holding workshops and circulating draft statements for comment.
The statement will include guidance for future developers based on the character of the landscape setting, settlement patterns, building forms and transport networks.
The statement is adopted by the local planning authority (as 'supplementary planning guidance' in the UK) and can be used to approve or reject planning applications from developers.
Photocredits
Kent, UK, 1997, Debbie Bartlett
Kent, UK, 1997, Debbie Bartlett

Reviewing progress
Villagers review pages with photographs and captions prepared during a local character workshop.
Tips
- The area covered by a statement can vary but the process works best at a village or neighbourhood level where people recognise each other. Break larger areas up and, if possible, combine with a Countryside Design Summary
(also see Glossary).
Costs
- Direct costs likely to be around US$5,000 if local skills and services used. More if elaborate printing involved. Need to have a budget for reprints, especially in areas of development pressure.
Sample local design statement process
- Establish design team
Small group of local people. Read handbooks. Discuss with planning authority. Prepare publicity. (1 month)
- Go public
Launch publicity. Draw in more participants. Prepare for workshop.
(1 month)
- Local character workshop
One-day event open to all. Main stages:
A. Mapping in groups to identify key walks, areas and landmarks on base maps. (see also Mapping).
B. Photographic survey in groups taking photos which capture the character of the area (see also Photo survey). Lunch while photos are developed.
C. Character assessment. Each group prepares presentation on character of the area using photos and maps.
D. Presentation and discussion.
Groups present their work. General discussion on local character and the next steps.
- Prepare design statement report
Expand design team. Refine and complete survey. Draft report. Consult on draft ( see also Participatory editing). (3 months)
- Consult with local planning authority
Agree draft with planners and planning committee. (2 months)
- Print report
Print report and distribute widely. Keep it in print and available. (2 months)
Total running time: 9 months minimum. Can take up to 18 months.
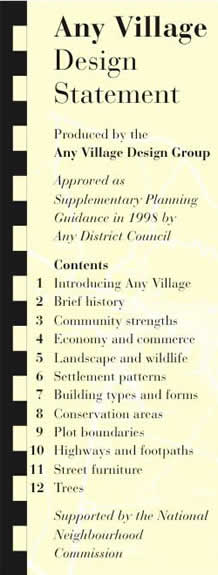
Sample report cover
Contents and style can vary according to local needs.
Contents and style can vary according to local needs.
Inspiration
-
"You saw the village in a completely different way than you ever had before. You really started to look at every single gable end, bit of tarmac and cobblestone. That was the most exciting thing, you learnt so much. It was an all round good exercise."